
A clean install clears the slate and provides Windows 11 a new beginning. You have faster performance, less glitchiness, and the latest features. If your PC is cluttered or you’re switching to a new drive, this guide takes you through the entire process.
Rapid Response: Create bootable Windows 11 USB, change PC to UEFI with Secure Boot and TPM 2.0 enabled, boot from USB, select Custom install, remove previous partitions, install Windows, then complete setup and updates.
What you will need
- 8 GB or larger USB drive (everything on it will be erased)
- Stable internet to download files
- Windows 11 product key or a digital license on your Microsoft account
- Backup of your important files to an external drive or cloud
Windows 11 minimum requirements
| Component | Requirement |
|---|---|
| Processor | 1 GHz or faster, 2+ cores, 64‑bit compatible CPU or SoC |
| RAM | 4 GB |
| Storage | 64 GB or more |
| Firmware | UEFI, Secure Boot capable |
| TPM | Trusted Platform Module 2.0 |
| Graphics | DirectX 12 compatible, WDDM 2.0 driver |
| Display | 720p or higher, 9 inches or larger |
Tip: Tip: Most PCs that were manufactured in the last few years will likely be compatible with UEFI, Secure Boot and firmware TPM (Intel PTT or AMD fTPM). You may just have to enable them in the BIOS.
Step 1: Download the Windows 11 installer
- Open your web browser and go to Microsoft’s Download Windows 11 page.
- Under Create Windows 11 Installation Media, click Download now to download the Media Creation Tool.
- Save the file. It’s a small launcher that will then pull down the full setup files.
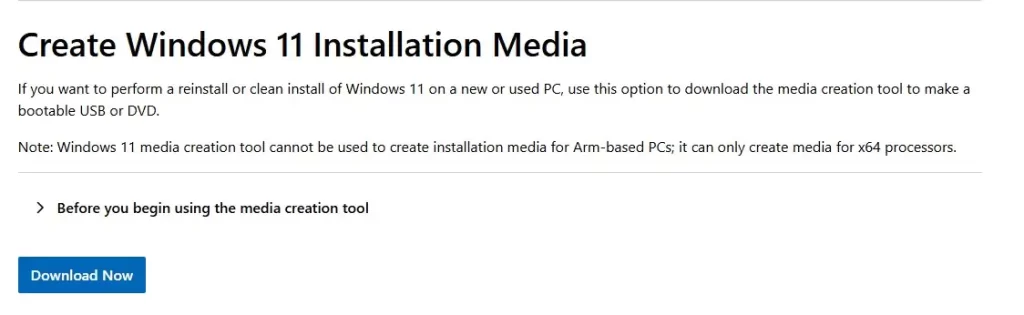
WHY should you use this method? It guarantees you the latest build from Microsoft rather than using an older installation image.

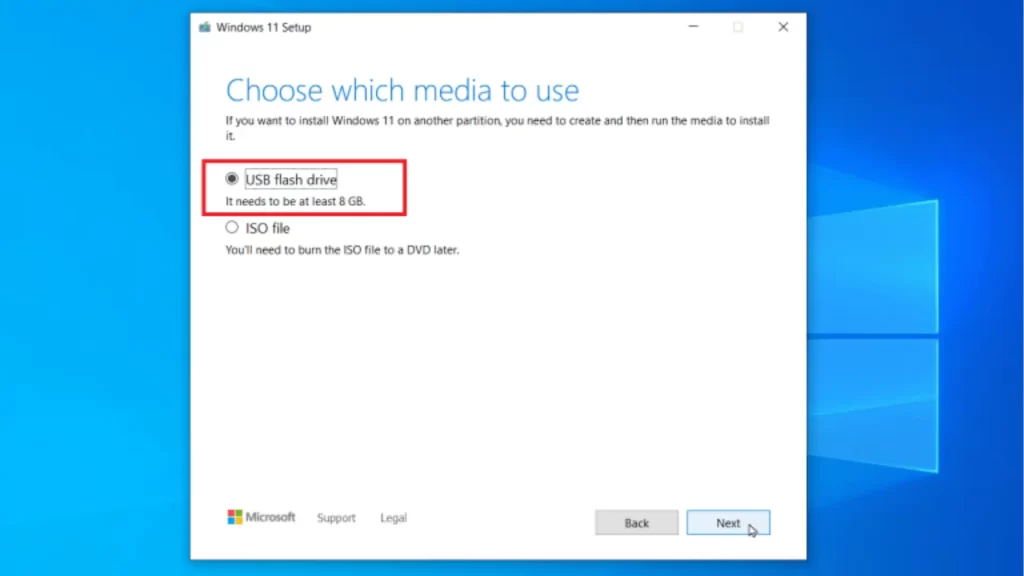
Step 2: Create a bootable USB
- Right‑click on MediaCreationTool.exe and select Run as Administrator.
- Accept the license.
- Pick Create installation media for another PC.
- Confirm language and edition (Windows 11 is 64 bit only).
- Choose USB flash drive, then select your USB.
- Let the tool download Windows and build the USB.
Warning: This erases the USB. Double‑check you picked the right drive.
Step 3: Configure the BIOS/UEFI properly.
You’re going to enable UEFI, Secure Boot, and TPM 2.0. Enable UEFI
Enable UEFI
- Restart and press the key for BIOS/UEFI setup (normally F2, Del, or F10).
- Find Boot settings.
- Set Boot mode to UEFI. If you see CSM, disable it.
Turn on Secure Boot
- In Security or Boot, open Secure Boot.
- Set OS Type to Windows UEFI mode if offered.
- Enable Secure Boot.
Enable TPM 2.0
- On Intel boards, enable PTT.
- On AMD boards, enable fTPM.
- Save and exit changes (usually F10).
Step 4: Boot from the USB
- Insert the Windows 11 USB.
- Then restart your PC and open the boot menu (usually F8, F11, or F12).
- Finish by selecting your USB drive. Your PC will start Windows Setup.

Step 5: Install Windows 11
Language and region
- Pick your language, time, and keyboard. Click Next.
- Click Install now.
- Enter your product key, or click I don’t have a product key to add it later.
- Select your edition if asked. Accept the license.
Choose installation type
- Click Custom: Install Windows only (advanced) for a true clean install.
Drive selection and partitioning
- Select the drive where Windows will live.
- For a full clean install, delete old existing Windows partitions: select each old partition and click Delete until you see Unallocated space.
- Select the Unallocated space and click Next. Setup will create:
- EFI System Partition (size 100–300 MB) for boot files
- Microsoft Reserved (MSR) 16 MB
- Primary partition for Windows
Warning: Deleting partitions erases data. Be sure your files are backed up.
Let setup copy files
- Setup copies files, installs features and updates, then reboots a few times.
- When the screen goes dark for the first reboot, remove the USB so you don’t boot from it again.
Step 6: First‑run setup (OOBE)
- Pick your country and keyboard layout.
- Connect to Wi‑Fi. Windows 11 Home requires internet and a Microsoft account.
- Name your device.
- Sign in with a Microsoft account, or set up a local account if allowed.
- Choose privacy settings. You can disable ad tracking, limit diagnostics, and turn off online speech recognition.
Local account tip: If you want to create a local account on editions that push online sign‑in, press Shift + F10, type OOBE\BYPASSNRO, and press Enter. The PC restarts and you’ll get an I don’t have Internet option, which then lets you create a local user. This is an advanced, unsupported path and may change in future builds.
Step 7: Post install checklist
Get updates and drivers
- Go to Settings > Windows Update and click Check for updates. Install everything.
- Open Advanced options > Optional updates to grab driver updates.
- If something still shows a warning in Device Manager, install drivers from your PC or component maker (graphics, audio, network, chipset).
Turn on System Restore
- Search Create a restore point.
- Select your system drive, click Configure, turn on protection, and set a few GB of space.
Power and privacy
- Pick a power plan that fits your use.
- Review app permissions under Privacy & security.
- Trim startup apps in Task Manager > Startup apps.
Security basics
- Make sure Windows Security is on and updated.
- If you use Windows 11 Pro, consider turning on BitLocker drive encryption.
Backups
- Set up File History or a cloud backup for your documents.
- Consider a full system image on an external drive for quick recovery.
Troubleshooting
Activation problems
- Go to Settings > System > Activation and run the Troubleshooter.
- If you changed hardware, sign in with the Microsoft account tied to your license and choose I recently changed hardware.
- As a fall‑back, use slui.exe 4 for phone activation.
TPM or Secure Boot not detected
- Update the BIOS/UEFI to the latest version.
- In BIOS, enable PTT (Intel) or fTPM (AMD) and turn on Secure Boot.
- Some motherboards need you to set OS Type to Windows UEFI.
“The selected disk has an MBR partition table”
- Your drive is using MBR while UEFI needs GPT. Two options:
- Safe, no‑wipe method: Use Microsoft’s MBR2GPT tool from Windows or WinRE to convert the disk.
- Clean method: In Setup, press Shift + F10 and run these commands to wipe and convert:
diskpart
list disk
select disk X   ← replace X with your disk number
clean
convert gpt
exit
Click Refresh, select the unallocated space, then Next.
Performance feels sluggish
- Remove heavyweight startup apps.
- Clean temporary files with Disk Cleanup or Storage Sense.
- Keep graphics and chipset drivers current.
- On HDDs, defragment; on SSDs, let Windows optimize automatically.
Optional software
- Browser: Microsoft Edge, Google Chrome, or Firefox
- Media: VLC
- Archive: 7‑Zip
- Office: Microsoft 365 or LibreOffice
- Extras: HWiNFO for hardware info, Malwarebytes for on‑demand scans
Caution: Be careful with “debloater” scripts or tune‑up utilities. They can remove features you might need.
Pro tips
- Keep the USB handy for future repair installs.
- After your first big update, create a fresh restore point.
- If you’re installing to a brand‑new SSD, plug it into the first NVMe/SATA slot for best performance.
What to avoid
- Don’t mix Legacy/CSM boot with a GPT disk. Stick to UEFI.
- Don’t skip backups before deleting partitions.
- Don’t force BIOS updates during a power‑cut risk.
FAQs
Do I really need TPM 2.0 and Secure Boot?
Yes for supported installs. Most modern PCs have firmware TPM and Secure Boot options in BIOS. If yours doesn’t, check the manufacturer’s site.
Can I install without a product key?
Yes. Click I don’t have a product key during setup. You can activate later with a key or digital license tied to your Microsoft account.
How long does a clean install take?
Usually 20–60 minutes depending on your SSD/HDD and internet.
Should I choose GPT or MBR?
Use GPT for UEFI systems. Windows 11 expects UEFI + GPT.
Can I create a local account on Windows 11 Home?
Windows pushes online sign‑in. The OOBE\\BYPASSNRO trick may expose an offline path, but it is unofficial and might change.
Why does my USB not show up in the boot menu?
Recreate the USB, use a different port, and confirm the ISO is Windows 11 64‑bit. On some boards, you must enable USB boot in BIOS.